
Datto RMM Integration BETA
The WithSecure™ Elements integration with Datto RMM automatically deploys and maintains the WithSecure™ Elements Agent on the devices Datto RMM manages. Once a company is mapped and a site policy is configured, every new device added to that Datto RMM site automatically receives the WithSecure Elements Agent and is protected — no manual intervention required.
Important: The integration only works with Datto RMM sites whose type is Managed. Sites that are not Managed (for example, On-Demand sites) are not supported.
What this integration does
- Automated agent deployment — Installs the WithSecure™ Elements Agent on new and unprotected Windows devices in mapped Datto RMM sites.
- Continuous monitoring and remediation — A site-level monitoring policy continuously checks devices and redeploys the agent whenever it is missing.
- Per-organization mapping — Maps Datto RMM organizations to WithSecure™ Elements organizations so subscriptions sync to the correct site.
- Native and multi-tenant — Configured entirely from the Elements Security Center and supports multiple customer organizations.
Before you begin
You will need:
- A Datto RMM account with permissions to create components and policies. Only Managed sites are supported.
- Access to the WithSecure™ Elements Security Center as a WithSecure Partner.
Step 1: Enable Datto RMM Integration from WithSecure Elements
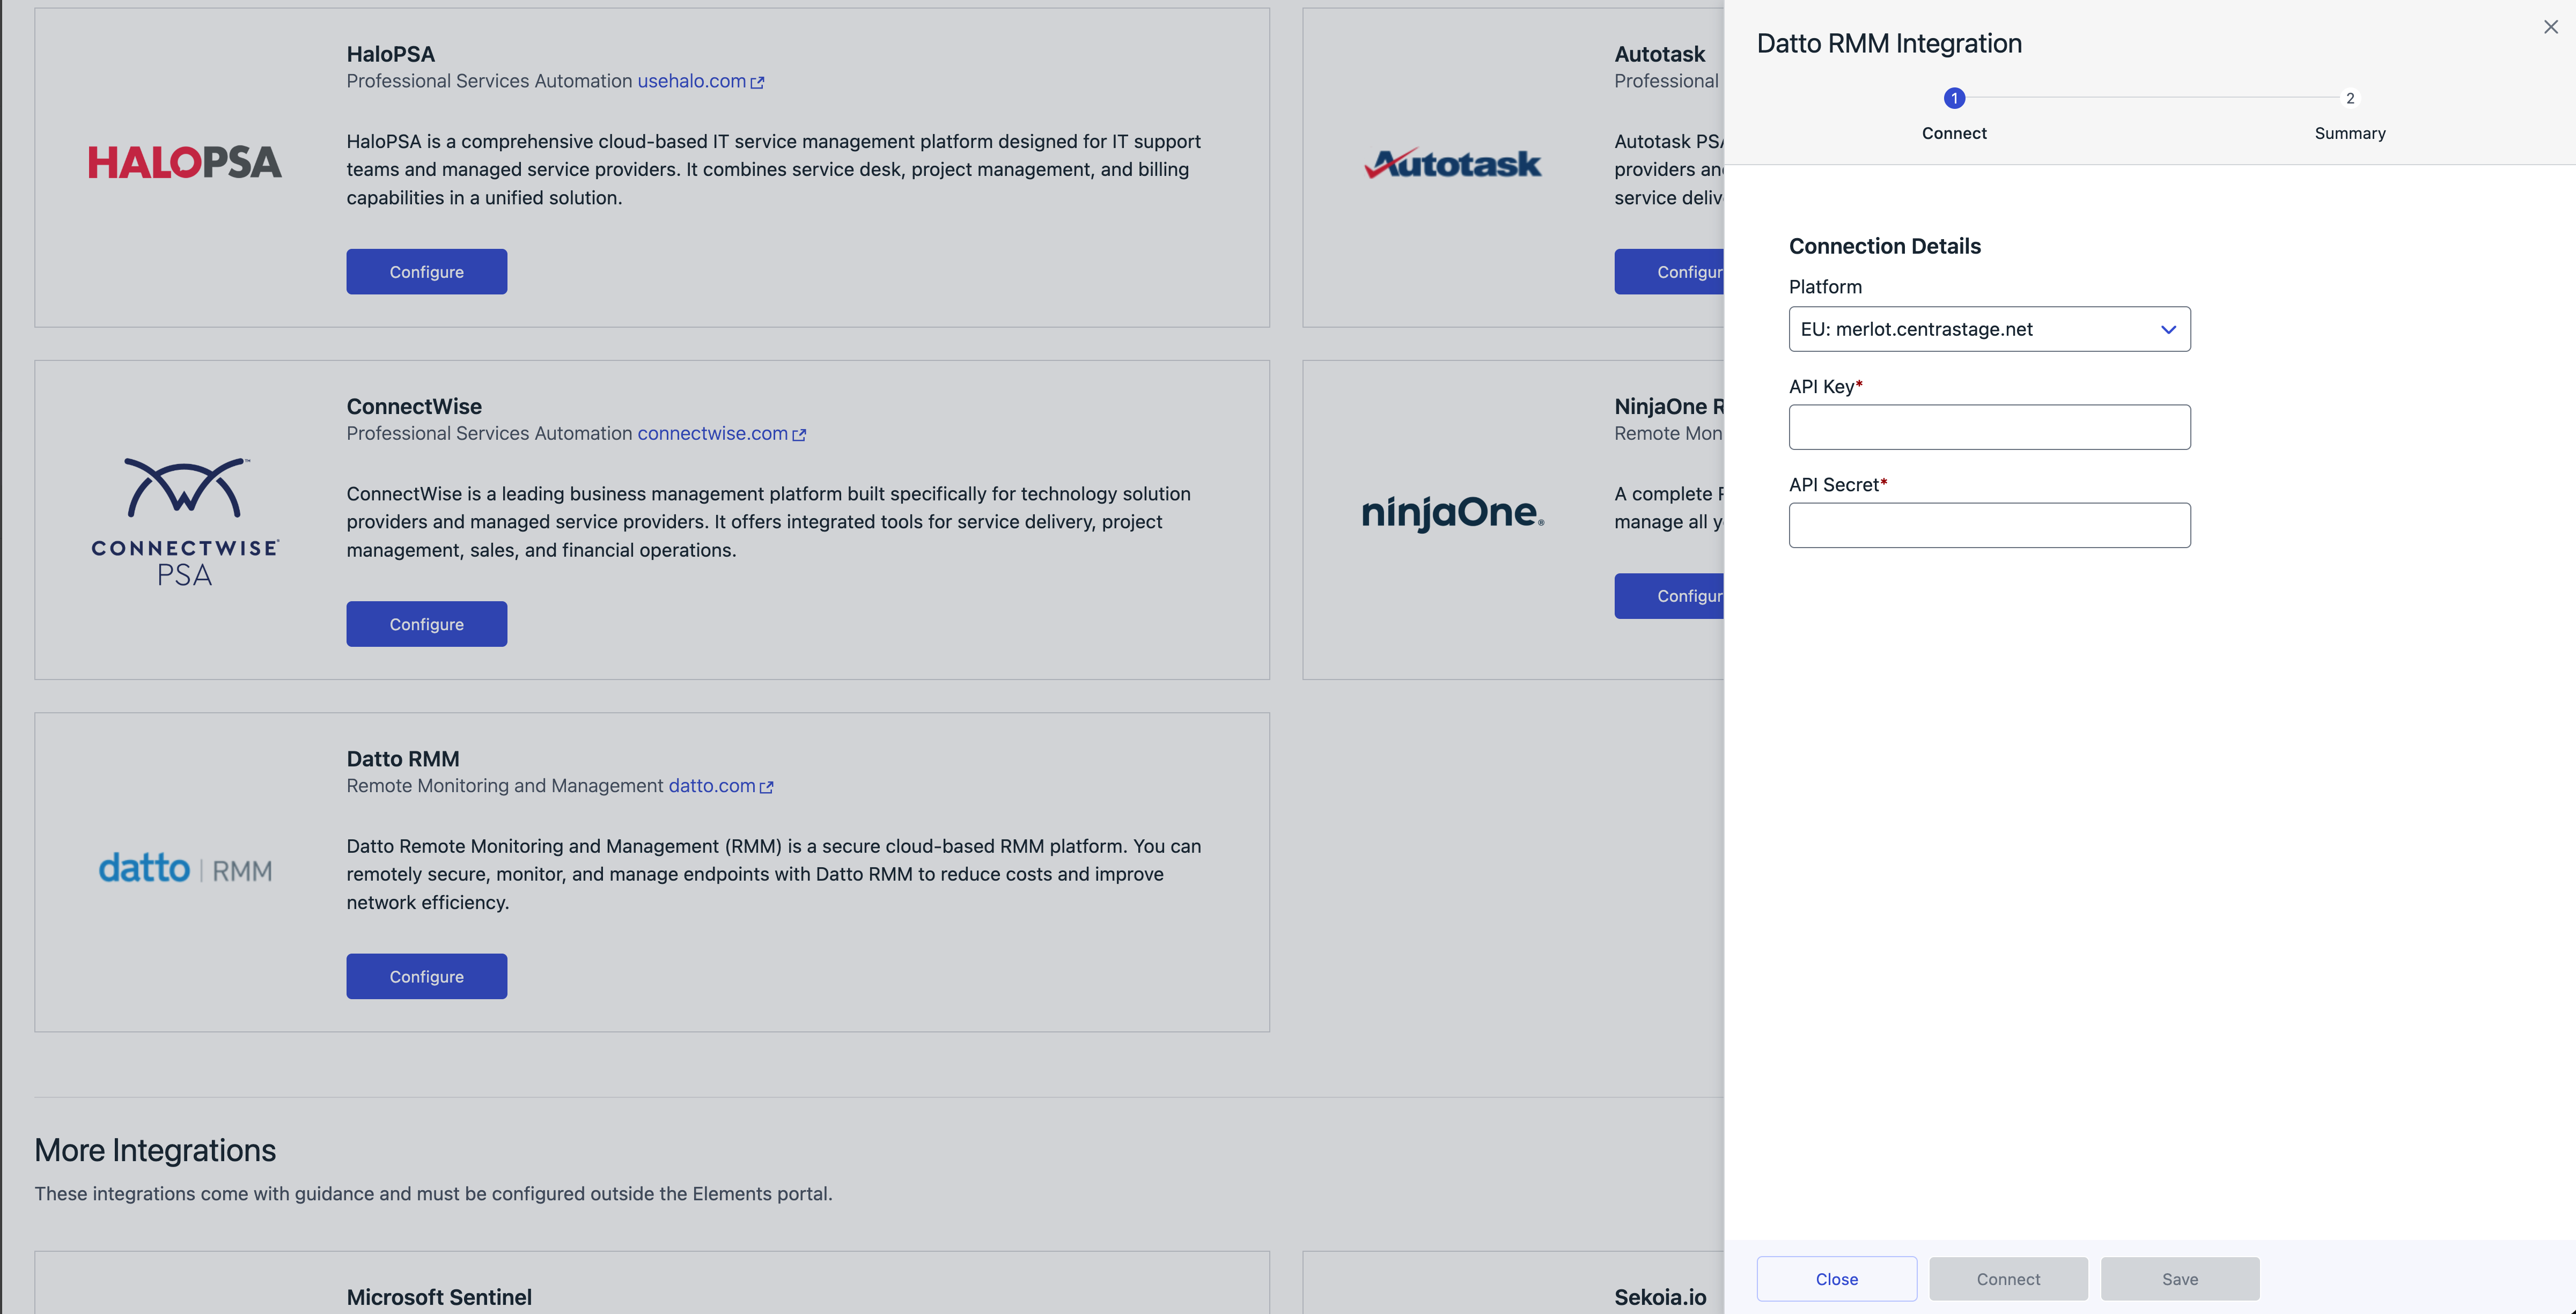
Connect your Datto RMM account to WithSecure™ Elements Security Center.
- Log in to WithSecure™ Elements Security Center.
- Go to the Management > Integrations section.
- Select Datto RMM and click Configure.
- Fill in your Datto RMM API credentials. You can obtain these from your Datto RMM account.
- Click Connect and then Save.
Step 2: Company Mapping
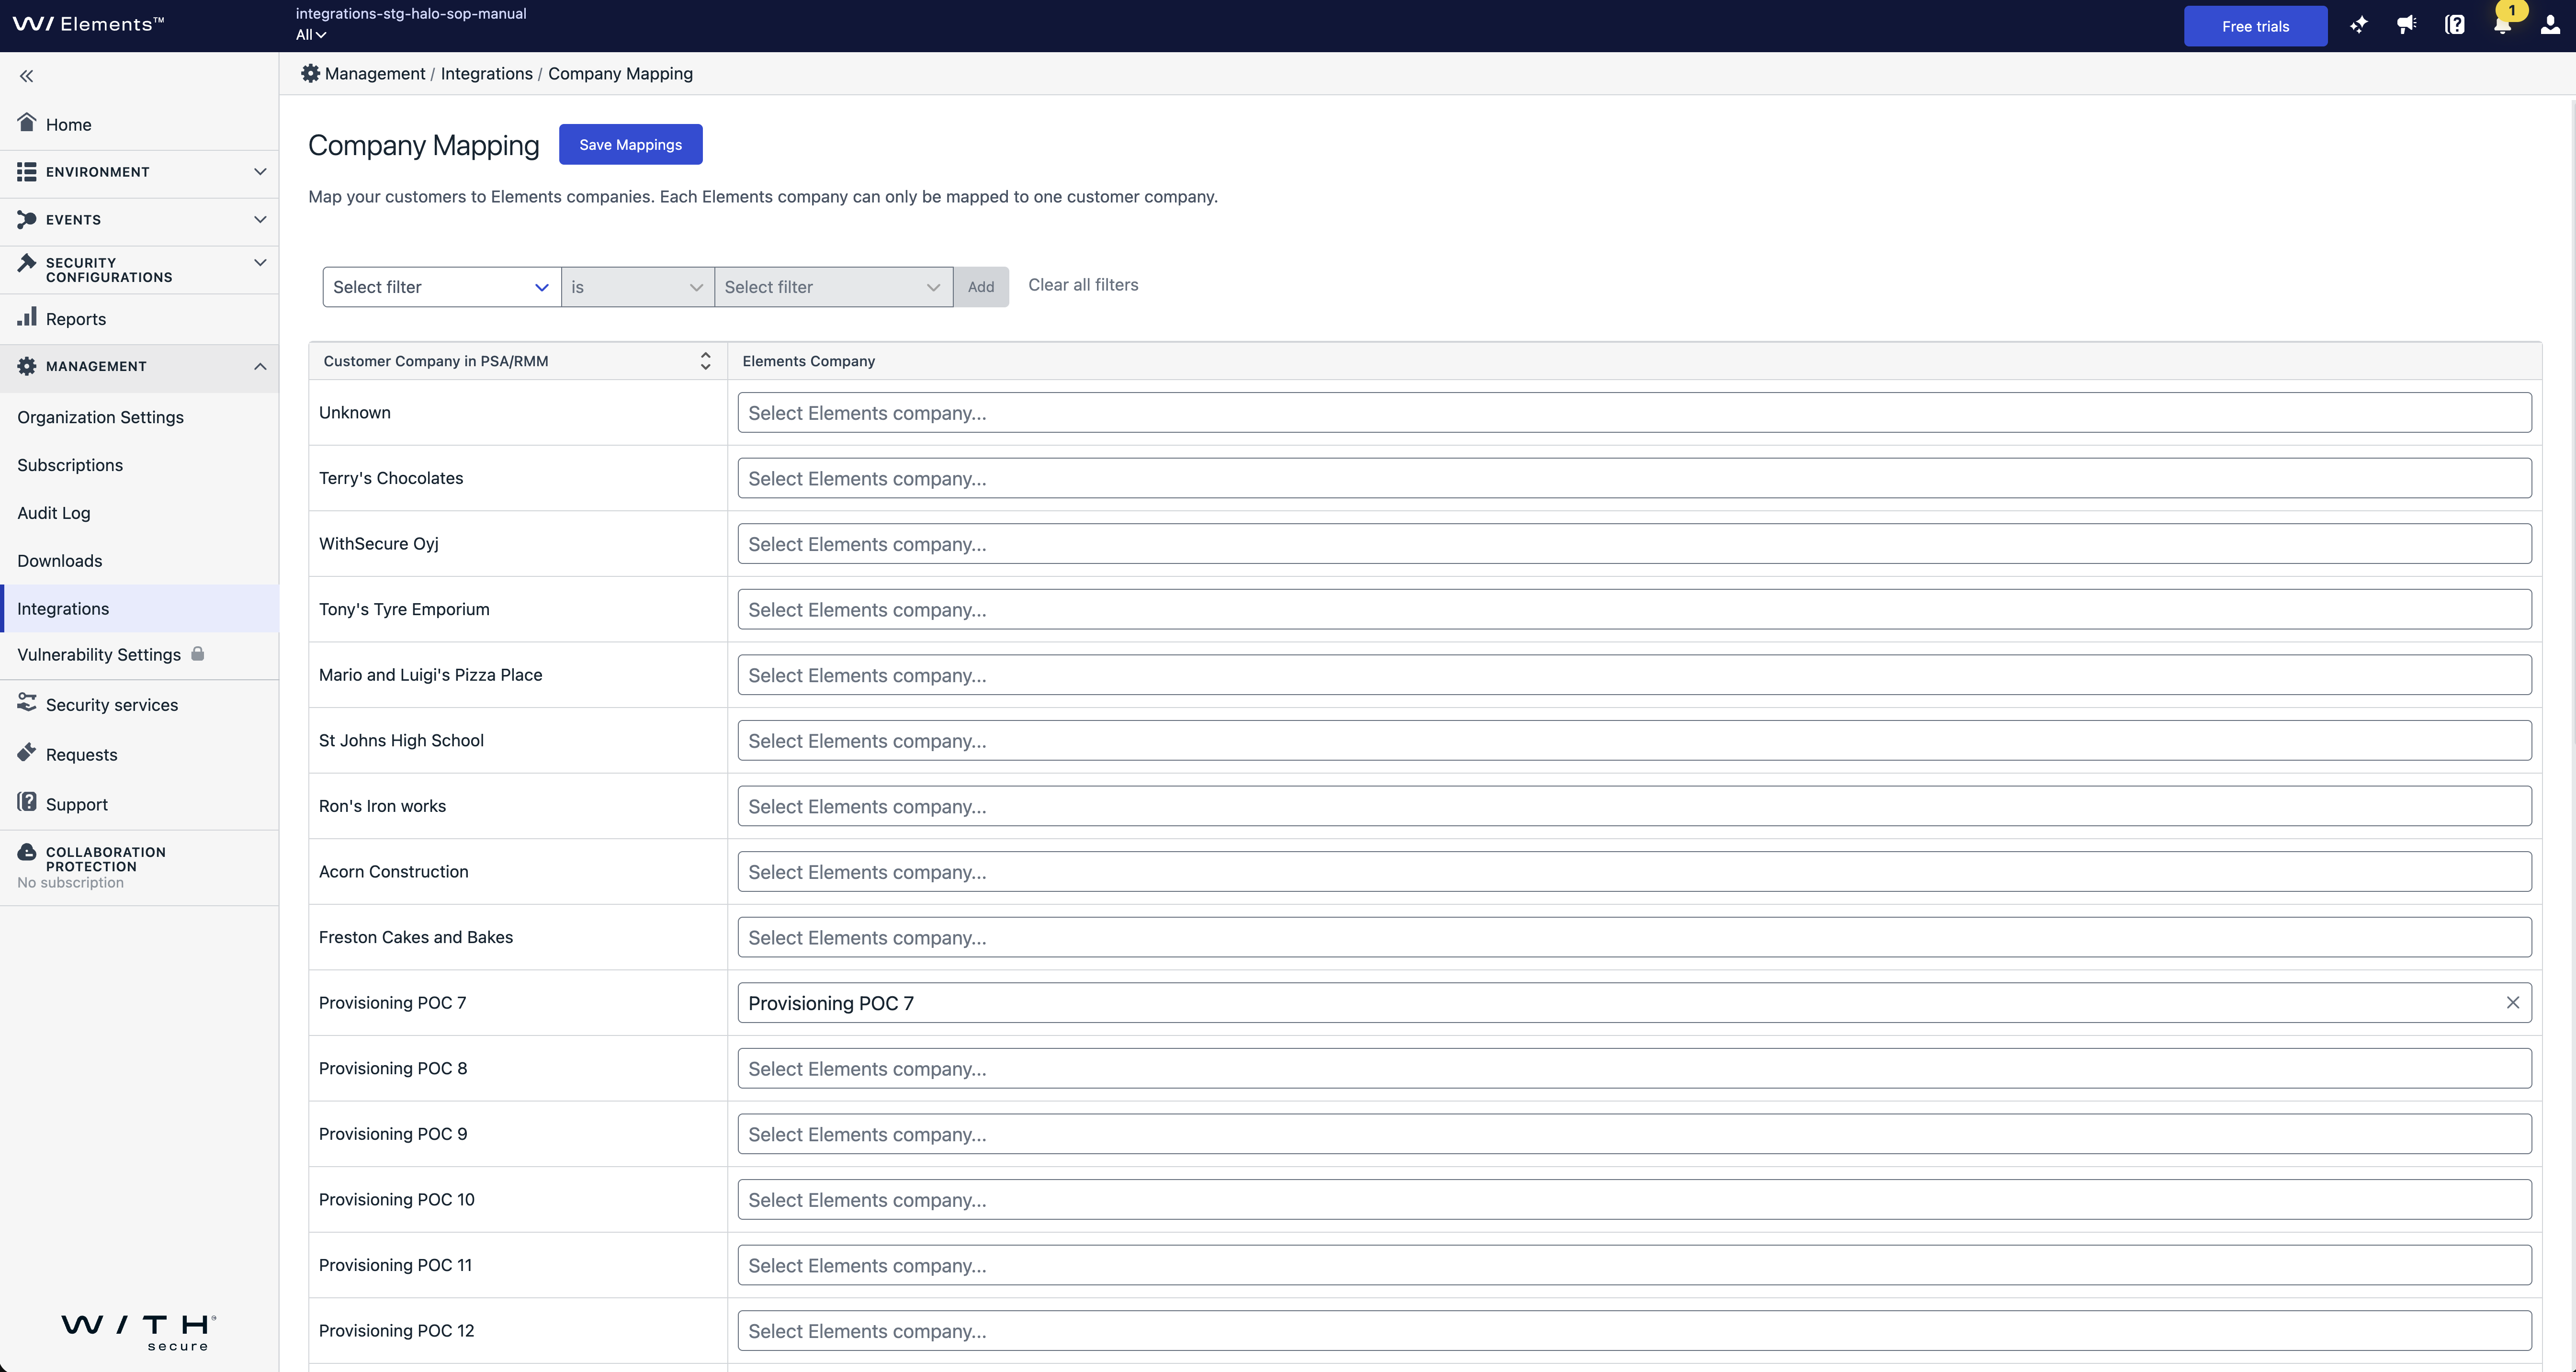
Map your Datto RMM organizations to WithSecure™ Elements organizations. After this, the subscriptions for WithSecure™ Elements organizations will be synchronized to the correct Datto RMM organizations.
- Navigate to the Management > Integrations section.
- On the Datto RMM integration card, click Company mapping.
- From the Company mapping table, map your Datto RMM organizations to Elements organizations.
- Click Save Mappings.
Step 3: Configure Automated WithSecure Agent Deployment in Datto RMM
This configuration enables automated WithSecure agent deployment in your Datto RMM account. Once in place, the policy will continuously monitor devices and deploy the WithSecure Elements Agent whenever it is missing.
The setup involves three steps:
- Add a monitor script component that detects whether the WithSecure agent is installed (one-time setup).
- Add a deployment script component that installs the agent (one-time setup).
- Create a Site-level Policy that uses the monitor to raise an alert and the deployment script as an automated response (per site).
1. Add a Monitor Script Component
1.1 Navigate to Components
- Log in to the Datto RMM portal.
- Go to Automation > Components from the left-side navigation panel.
1.2 Create a New Script Component
- Click Create Component.
- Choose Monitors as the category.
- Provide a name and description.
1.3 Configure the Script Component
- Select PowerShell as the script interpreter.
- Paste the script contents into the script editor.
$scriptVersion = "2.1"
Set-StrictMode -Version Latest
$ErrorActionPreference = "Stop"

function PrintScriptVersion()
{
    Write-Host "Script version $scriptVersion"
}

function WriteAlertAndExit($alertText)
{
    Write-Host "<-Start Result->`nWithSecure_Monitor_Result=$alertText`n<-End Result->"
    exit 1
}

function GetVariable($variableName, $defaultValue)
{
    $variableValue = [Environment]::GetEnvironmentVariable($variableName, "Process")
    if ($variableValue -eq $null)
    {
        $variableValue = $defaultValue
    }

    return $variableValue
}

function IsVariableSet($variableName)
{
    $variableValue = GetVariable $variableName "false"

    if ($variableValue -eq "true")
    {
        return $true
    }
    else
    {
        return $false
    }
}

function CheckProductInstalled()
{
    $registryPath = "HKLM:\SOFTWARE\WOW6432Node\F-Secure\OneClient"
    $registryKey = Get-ItemProperty -Path $registryPath -ErrorAction SilentlyContinue
    if (($registryKey -ne $null) -and ($registryKey.Version -ne $null))
    {
        return $true
    }

    $registryPath = "HKLM:\SOFTWARE\F-Secure\OneClient"
    $registryKey = Get-ItemProperty -Path $registryPath -ErrorAction SilentlyContinue
    if (($registryKey -ne $null) -and ($registryKey.Version -ne $null))
    {
        return $true
    }

    return $false
}

function PerformChecks()
{
    if (-not (CheckProductInstalled))
    {
        WriteAlertAndExit "WithSecure Elements Agent is not installed"
    }
}

PrintScriptVersion

try
{
    if (-not (IsVariableSet 'WITHSECURE_ENABLED')) {
        Write-Host 'WithSecure disabled for the site. No actions required.'
    }
    else {
        PerformChecks
        Write-Host 'All checks have passed'
    }
}
catch
{
    WriteAlertAndExit $_.Exception.Message
}
- Configure:
- Timeout (e.g., 300 seconds)
- Sites (e.g., All Sites)
- Save the component.
2. Add a Software Deployment Script Component
2.1 Navigate to Components
- Go to Automation > Components from the left-side navigation panel.
- Click Create Component.
2.2 Configure the Script Component
- Choose Scripts as the category.
- Provide a name and description.
- Select PowerShell as the script interpreter.
- Paste the script contents into the script editor.
$scriptVersion = "2.2"
Set-StrictMode -Version Latest
$ErrorActionPreference = "Stop"

function PrintScriptVersion()
{
    Write-Host "Script version $scriptVersion"
}

function IsRunAsAdministrator()
{
    $currentPrincipal = [Security.Principal.WindowsPrincipal][Security.Principal.WindowsIdentity]::GetCurrent()
    return $currentPrincipal.IsInRole([Security.Principal.WindowsBuiltInRole]::Administrator)
}

function WriteAlertAndExit($alertText)
{
    Write-Host "<-Start Result->`nWithSecure_Task_Result=ALERT: $alertText`n<-End Result->"
    exit 1
}

function GetVariable($variableName)
{
    return [Environment]::GetEnvironmentVariable($variableName, "Process")
}

function GetFailureReason([int]$exitCode)
{
    switch ($exitCode)
    {
        0 { return "Success" }
        1 { return "Failed" }
        2 { return "Cancelled" }
        3 { return "Integrity check failed" }
        4 { return "MSI service is busy" }
        5 { return "Out of disk space" }
        6 { return "MSI interface version is not compatible (installer is too old)" }
        7 { return "Failed to install Universal CRT" }
        8 { return "Failed to install .NET framework" }
        9 { return "Invalid sidegrade package" }
        10 { return "Sidegrade failed" }
        11 { return "Key code is missing" }
        12 { return "Temporary error. Try again." }
        99 { return "Pending reboot" }
        100 { return "Installation pending" }
        101 { return "Installation succeeded, but reboot is required" }
    }
}

function GetRedactedParameters($parameters)
{
    if ([string]::IsNullOrWhiteSpace($parameters))
    {
        return $parameters
    }

    return ($parameters -replace '(?i)(--voucher\s+)(?:"[^"]*"|\S+)', '$1[REDACTED]')
}

function InvokeExe($exePath, $parameters)
{
    Write-Host "filePath: $exePath"
    Write-Host "parameters: $(GetRedactedParameters $parameters)"
    $process = Start-Process -FilePath $exePath -ArgumentList $parameters -PassThru -Wait
    if ($($process.ExitCode -ne 0) -and $($process.ExitCode -ne 100))
    {
        WriteAlertAndExit "Installation failed. ExitCode: $($process.ExitCode). Reason: $(GetFailureReason $process.ExitCode)"
    }
}

function GetTempFolder()
{
    $commonAppData = [Environment]::GetFolderPath("CommonApplicationData")
    return Join-Path -Path $commonAppData -ChildPath "WithSecure\temp"
}

PrintScriptVersion

if (!$(IsRunAsAdministrator))
{
    WriteAlertAndExit "The script requires administrator rights"
}

# Detect Windows product type: 1 = Workstation, 2 = Domain Controller, 3 = Server
$productType = (Get-CimInstance -ClassName Win32_OperatingSystem).ProductType
Write-Host "Detected Windows ProductType: $productType"

if ($productType -eq 1)
{
    Write-Host "Windows Workstation detected, using WS_LICENSE_WIN_WORKSTATION"
    $licenseKeyCode = GetVariable "WS_LICENSE_WIN_WORKSTATION"
    if (!$licenseKeyCode)
    {
        WriteAlertAndExit "WS_LICENSE_WIN_WORKSTATION variable is not defined"
    }
}
else
{
    Write-Host "Windows Server detected, using WS_LICENSE_WIN_SERVER"
    $licenseKeyCode = GetVariable "WS_LICENSE_WIN_SERVER"
    if (!$licenseKeyCode)
    {
        WriteAlertAndExit "WS_LICENSE_WIN_SERVER variable is not defined"
    }
}

$additionalArgs = GetVariable "WS_ADDITIONAL_ARGS"
if ($additionalArgs -eq $null)
{
    $additionalArgs = ""
}

$tempFolder = GetTempFolder
New-Item -ItemType Directory -Force -Path $tempFolder | Out-Null

$installerLocalPath = Join-Path -Path $tempFolder -ChildPath "networkinstaller.exe"
$webClient = New-Object System.Net.WebClient
Write-Host "installerLocalPath: $installerLocalPath"
try
{
    $withSecureEnv = GetVariable "WITHSECURE_ENV"
    if ($withSecureEnv -eq "CI")
    {
        $installerUrl = "https://artifactory.internalsecure.com/artifactory/cta-generic-dev-local/oneclient/latest/psb/oneclient-PSB-blue.exe"
    }
    elseif ($withSecureEnv -eq "STG")
    {
        $installerUrl = "https://download.withsecure.com/TP/PSB-Live/latest/ElementsAgentInstaller.exe"
    }
    else
    {
        $installerUrl = "https://download.withsecure.com/PSB/latest/ElementsAgentInstaller.exe"
    }
    $webClient.DownloadFile($installerUrl, $installerLocalPath)
}
catch
{
    Write-Host $_.Exception.ToString()
    throw $_.Exception
}

InvokeExe $installerLocalPath "--silent --voucher $licenseKeyCode $additionalArgs --installation-tags PSB=integration_dattormm"

Write-Host "Installation successfully completed"
- Configure:
- Timeout (e.g., 300 seconds)
- Sites (e.g., All Sites)
- Select Add Variable and add the following variables:
| Name | Type | Default Value |
|---|---|---|
WS_ADDITIONAL_ARGS | String |
- Select Add Post-Condition and add the following:
| Warning Text | Qualifier | Resource |
|---|---|---|
ALERT | Is found in | StdOut |
- Save the component.
3. Create a Site-Level Policy Using Both Components
3.1 Navigate to Policies
- Go to Policies > Monitoring in the Datto RMM portal.
- Click Create Policy.
3.2 Configure Policy Details
- Give the policy a descriptive Name and Description.
- Choose Scope: Site.
- Search and choose the correct site. The site must be a Managed site; other site types will not work with this integration.
- Choose Type: Monitoring.
- Select Add Target in the Targets section.
- Search for and add All Windows Desktops and All Windows Servers.
3.3 Add the Monitor Component to the Policy
- Click Add Monitor.
- In the Monitor Type section, click Select.
- Select Component.
- In the Alert section, click Select a Component Monitor.
- Choose the monitor script component created in Step 1.
- Configure the execute interval, alert priority, and auto-resolve time according to your company policy.
3.4 Add Automated Remediation (Deployment Component)
- In the Response section, select Run Component.
- Choose the deployment script component created in Step 2.
- Save the changes by selecting Add Monitor.
3.5 Validate and Enable the Policy
- Review the full policy.
- Enable the policy.
- If everything is correct, click Save and Deploy Now.
Troubleshooting
If devices are not protected as expected, review the integration logs in the Elements Security Center:
- Go to the Management > Integrations section.
- Open the active Datto RMM integration.
- Select Logs to review recent integration activity and error details.